Slider

Family category
Showing posts with label Family. Show all posts

Spring Cleaning with Kids

Wednesday, March 20, 2019

Well guys, Spring has finally sprung. There is just something about the sunshine and birds chirping that is so refreshing, especially after a long, cold winter. A clean home is just as refreshing. That spring cleaning checklist can be overwhelming though, am I right? To lighten the load, and just as a general rule, I try to get the kids involved. They seriously love to "help". Don't get me wrong, they definitely don't enjoy helping with everything on my spring cleaning list; but there are some things the kids seem to find exciting. Teaching my kids what it takes to take good care of a home is something I strive to do. Spring cleaning is a great opportunity to teach them things they may not see you do on the day to day basis. Sometimes  it's the simple things that are the most fun! Here are some easy things the kids can help you with this spring.


Washing Windows

We love to use this recipe to wash windows:

1 Cup Vinegar
1/4 Cup Dawn Dish Soap
1 Liter (ish) Warm Water 

 All you need is this mixture, a bucket, a washcloth, a towel, & a squeegee. Our kids love to scrub the windows with the soapy washcloth, and using the squeegee is their fave! They can also help measure the washing mixture & pour it into the bucket. 

Cleaning Mattresses

Sprinkle some baking soda on the mattress and get that vacuum out! The kids think its super fun vacuuming the mattress. Not sure why, but I think it is because vacuuming a mattress just seems silly, and out of the norm. 

Shower and Bath 

We have super hard water here in Eastern Washington, its awful! On our glass shower doors we use vinegar mixed with Dawn Dish Soap, heated up and sprayed on to be left overnight. The kids love spraying ANYTHING, and I let them put their bathing suits on and get in while the water is running to help scrub it all off. Don't forget the squeegee at the end! 

Baseboards/walls

Our baseboards, as well as the majority of our walls are white. We use a Magic Eraser to get all the scuffs and spots off. Honestly, I think the only reason my kiddos love this is because they get to use a "MAGIC" Eraser. Hey, if they're helping I'll call it a win! I just give them one and we tackle each room together. Before we use the eraser I usually use a microfiber cloth and some dusting spray. PRO TIP: Don't get the knock off brand Magic Eraser! They don't work and you will end up using twice as many! 

Dusting 

This one is pretty self explanatory. In the spring I usually take down all of my home decor on my shelving and dust those hard to reach places. The kids love to spray the dusting spray as well as help to wipe it off. One thing I let my daughter do this year, is take a picture of how the shelf was arranged before we took everything off. She loves to take pictures, and enjoyed telling me where to put everything back when we were done.

Hope this helps to get you into the spring cleaning mood. Thank you so much for reading! I'll be posting my favorite spring cleaning playlist soon on my insta page so keep an eye out! Happy cleaning! 

-Kaci


Living Without a Dream

Tuesday, March 12, 2019

Living without a dream.

This is something that is not easy for me to write, something I would only talk about during those late night cry sessions with my husband, or mid day calls while the kids were at school to my besties. When I sat down to write this, my intention was to write about being unmotivated at work and how to see past it and get through it, but when I sat down and wrote the title, for some reason my fingers typed "Living without a dream". Even typing it seems sad, let alone saying it outloud. Sadly, this is how I sometimes find myself feeling. Going through the motions, day after day, week after week. Wearing the same hats, "Mom", "Wife"....and? "Starbucks Shift Supervisor". Not that it's a bad thing.

I love being "Mom", I love being "Wife"; but "Starbucks Shift Supervisor" wore out it's welcome years ago. This is my SIXTH year. Whenever I would bring this up to my husband, family or friends, they always say, "Well why not try something new?". I would always have the same answer; "It's a great company, and the flexible hours give me the ability to work around my husband and my kiddos schedules. Childcare is avoided and it is my time to get out of the house, while still feeling like I am contributing". All of these things are still true. I was Ok with this; because I knew it isn't my career. It wasn't my passion, it worked (and still works) best for my family. I think I always told myself it was temporary.

Well, here I am 7 years later. All of a sudden I'm 30 years old, working with mostly "20 somethings", and YOUNGER. I felt inadequate all of a sudden. Like my working part time and "mommin' it" just wasn't cutting it anymore. I voiced this concern to my husband one day before heading in to work. Being the most supportive person I know, he tells me, "Kaci, just quit. Do whatever else you want to do. I will support you 100% in whatever job or dream you chose". Heartthrob, right? I know I am pretty lucky.


I went to work that night pondering my options. I browsed the job listings on my lunch break; nothing desirable there. I thought about what I used to want to do, before I left college; Event Coordinator. Then I thought about my recent healthy meal prep adventure. Two things I felt passionate about. That night, I came home from work, and started researching how to write a business plan. I ended up writing two; one for Event Coordinator, and one for the healthy meal prep business. After writing them, I felt accomplished, but not compelled to follow either path.

I live in a small town. I felt I was limited. I was scared I wouldn't be able to make enough, all while having to spend pretty much every waking moment working; away from my children, away from my husband. Would it be worth the trouble? The mom guilt set in. The fear of failing set in. The fear of putting my family in a bad situation financially, as I would need to take out a loan in order to start either of these businesses. I could never. The passion I had tried to "rekindle" for a career in events, or in meal prep, quickly faded.

 I spent some time thinking about going back to school, and trying to figure out what  I would go for, but nothing stuck out. I felt like I was back in high school. Maybe you know the feeling. You know the one where everyone is asking you what college your going to go to and what you want to be when you grow up? Except I was the one putting the pressure on myself, and I couldn't come up with an answer.

Then, one night, laying in bed. It just came to me, like a slap in the face. It was like someone just said to to me, "Kaci, you don't have a dream". BOOM. Talk about a crappy feeling. I sobbed to my poor husband. Explaining to him that even if I had the chance to do whatever I wanted, I had absolutely no clue what that would even be. There was nothing he could do to make me feel better. I cried myself to sleep that night, wallowing in my own little pity party.

After coming to this conclusion, a multitude of emotions went running through me. Initially I felt sad, then I felt angry. Then, a few days later,  the envy set in, and it didn't leave for quite a while, (As if it was his fault..) My husband had recently received a promotion at work, and was really excelling in his new role. I was so proud of him, I really was (and still am). Not only that, he had also recently lost around 50 pounds. He had a new dress code for his new job, so he went out and bought a whole new snazzy wardrobe. His new favorite store was "Jos. A. Bank". He looked good. He felt good. He was just killing it at life. I feel like you might be able to see where this is going. It was during all of his success, that I (selfishly) started to think about my own. He left for his dream job every day, looking amazing and feeling great; while I went to mine, in my same regular work clothes, doing the same regular job I had been doing for what seemed like eternity. Cue the violins people. I truly felt so sorry for myself. I felt jealous. I felt insecure. Why would someone like him want to stay with someone like me? I labeled myself; fat, ugly, unsuccessful, jealous, uninspired, lazy...the list went on. I told myself daily that he would soon grow tired of being around someone like me. I told myself I was bringing him down, and I believed it. I was really in a funk.

Guess what? I am none of those things, but I started to become those things. I was so down on myself that I spoke those words out loud and in my head daily. I started up old, bad habits. Those ones I thought I had left far behind me. Eating badly, procrastinating, showing up late for things, not exercising...the list goes on. It sucked. Not only did it suck for me, but it sucked for my husband. Finally, after this went on for a while, I realized enough was enough. Time to put my big girl panties on, as they say, and get this figured out.

 The thing about happiness is, that it looks very different for each individual. Seems obvious right? What makes my husband happy, is not necessarily what will make me happy. My husband has worked for this "dream job" of his, his whole entire adult life. He joined the Air Force to learn the job, even. He knows this is what he wants to do, and he has super awesome, fulfilling goals he wants to accomplish within that career path. 

I started reading some "personal development" books, and listening to some uplifting podcasts. I learned quite a bit and I felt my mindset start to shift. I did some inventory on the things I follow on social media, and in real life, & said bye bye to all the negativity. I started to see all the positive things I had in my life, and realized what truly makes me happy. I am happiest when I am with my family. My job did not define my happiness. This life we have created together was definitely not what I had planned. It looks nothing like I ever imagined it would.

It looks better.

 I have two beautiful, healthy children and a husband who loves me. He loves us enough, to put in the work to become the very best version of himself for us every day. I see my daughter and my son every morning when they wake up, and watch them fall asleep almost every night before I go to bed. I get to spend the majority of my day in our home, playing with my children, and teaching them things. I get to help mold them into their best selves, and help them follow their dreams. I get to plan adventures and trips for our family, and I get to go on them too, instead of being stuck working days on end. I get to spend time with my husband. The best part of all these things, is that they all make me happy. Like fill my heart up type of happy. It has taken me a long time to realize that it is OK for me to be happy with simply being the best mom I can be for my children. My career isn't where my happiness is found (currently), it is at home. 

Yes, I sometimes wish I would have moved to San Diego and became a super cool, fancy pants event planner. But I have a whole lot of other things that make me happy; none of which I would trade for a career, not in a million years, because that is not my path. Not if it meant not having my sweet family, exactly the way it is. Maybe one day I will find happiness in a "dream" career, when my kids are in school, or when they are out of school and out of the house; or maybe I'll find it next week, maybe I won't. But for now, I feel thankful I have found my happiness somewhere else. Somewhere unexpected, and unplanned, maybe, but found, nonetheless. Found in the little moments, in between those day to day things, that I sometimes tire of. 

I am living without a dream, because I am living in a place of happiness I had never dreamt was possible.


-Kaci


The Complete Guide for Beginner Hockey Parents

Sunday, November 11, 2018


Hey friends!
Hockey season is approaching fast for us here at the Howard home. It is a very busy time of year for us. Both of my kids, Kade and Leighton, play hockey; and my husband, Ty, coaches & plays as well. Hockey was very foreign to me for most of my life. When I met Ty, he introduced me to the sport and I fell in love with watching the fast paced and exciting game. When our kids started taking interest in it,  I REALLY had to learn the ins and outs. It can be a little overwhelming; if it wasn't for Ty I am not sure how I would have figured it all out, to be honest. Lots of equipment and not a whole ton of information about it online, that I could find. That is why I have decided to create this complete guide for new hockey moms, dads and players!


First I will start off with the equipment run down; what you will need and what you don't need but might want. **Keep in mind all hockey associations are different and many offer rental gear, what is included will probably vary!**

Hockey Equipment


-Helmet with Face Cage

Helmets range greatly in price depending on the quality. Typically at the younger age groups it is not necessary to buy the "top of the line" $300 helmet, because body checking is not allowed until age 13 or older. The fit is the most important thing when looking for a hockey helmet for your kiddo. It should fit tight, but also comfortable. The helmet should not fit your kid like a bucket, because ultimately it is what will protect your child from getting a concussion or any other serious head injury. Most helmets are adjustable in size & it is always a good idea to keep a phillips screwdriver in your bag so you are able to make adjustments when necessary, on the fly. It is best if you can go to a store where your child can try on the helmet in person, but if you are forced to order online, be sure to pay close attention to the sizing charts and follow directions for measuring your child's head. 
Most youth helmets come with a face cage. Keep in mind that if you play in an outdoor rink, the clear "fish bowl" style facemasks tend to fog up. PRO HOCKEY MOM TIP: If your child does have a "fish bowl" style facemask, a quick spray of Pledge Furniture Spray, will prevent fogging.
 Here are links to the helmets our kiddos have; Leighton's helmet (6 years old) & Kade's helmet (3 years old).
Another thing about helmets, when you are putting it on your child, you really have to PUSH HARD to get the snaps into place. The first time I did it I thought it was going to break! They do "wear in" after a while and become a bit easier. Don't be alarmed if it takes a little elbow grease to get the mask and chin guard snapped into place. 

-Hockey Skates

It is not difficult to find youth hockey skates online in the $500-$1000 range; but let's be honest, no beginner needs a skate that is designed for elite level play. Bauer and CCM typically make the best quality and most durable skates.
When finding a skate, much like a shoe, it is best that your child can try it on in person to find the best fit for them. Hockey skates tend to run a size or two smaller than a normal shoe size, this can make online shopping that much more difficult. If your child is still growing, it's a good idea to go for a cheaper pair, since they may grow out of them by the end of the season. Another option, if you anticipate them playing more than once season, is to purchase a higher quality pair in a size bigger so they can have room to grow into them and potentially use them for more than one season, without them wearing out. 
After you find the right skates, you kiddo will need to break them in.
Here is how we do it;

STEP 1: Put a hair dryer inside the boot of the skate, on high heat and high flow, for 3-5 minutes. STEP 2: Take the hair dryer out and have your kid stick their foot in immediately.
STEP 3: Tie the skates as tight as you can, then have the kids walk around the house in them for about 15 minutes. (If you don't have carpet make sure the skates have skate guards on them, click HERE to see the ones we like)

The heat from the hairdryer loosens the gels inside the boot of the skate and then molds to the child's foot, making for a perfect fit. Another way of "baking" the skates is to actually bake them in your oven. HERE is a video describing that process in more detail, if you are interested.
Before the skates actually hit the ice, they will need to be sharpened. You can take them to your local ice rink, or hockey pro shop to have this done. Beginner hockey players should have their skates sharpened at about 5/8". 

Here are the links to the skates our kids have; Leighton's skates Kades skates.

-Hockey Stick

First and foremost, when it comes to a hockey stick PRICE MEANS NOTHING. Crazy huh? 
Here are the main things you need to consider when choosing a stick:

1.) Material
Composite is the best material for an ice hockey stick. Wood sticks are cheaper, but they are super heavy, and not very durable. What you save in price will be made up in replacement sticks. 

2.) Flex
All sticks have a "flex number", this basically represents how "bendy" the stick shaft is. The lower the number, the more bend in the stick. The ideal flex number for your child will be roughly half of their body weight. For example, my daughter weighs 60lbs, so the flex on her stick should be around 30.  Here is a picture of a hockey stick "flexing", I just found it on Google!


3.) Brand
There are a lot of different brands out there. The three we like to stick with are CCM, Bauer & Easton. These companies have been around forever and their technology is top of the line compared to any other brands. They also offer high quality sticks at affordable prices. 

4.)Curve 
Curve is personal preference, which a beginner/child won't typically have. The curve won't make much difference for beginners. Leighton, Kade and Ty all have the same exact curve but in three different brands. The circled column in this picture is the curve they have. This curve is the best for overall performance. Ignore all the other stuff; it's a little confusing!


5.) Length
Your child's stick should come up to their nose height, when they are standing flat footed without shoes or skates on. When they have skates on, it should be just up to their chin. This is Leighton with her stick, flat footed. 

Here are links to Leighton's Stick, and Kade's Stick. 

-Shoulder Pads, Shin Pads & Elbow Pads

Does this remind anyone of rollerskating when they were younger? I remember we all wanted matching sets of these! Ha, ha! Shoulder pads, shin pads and elbow pads are all about comfort. You will want to chose the brand and size that fits your child the most comfortably and each child is different. Typically you can find these three items in sets for a discounted price. Here is the link to Kade's set. Leighton's did not come in a bundle but are part of the Bauer Nexus 7000 line, and all the pieces are available at Hockeymonkey.com. 

-Gloves

The cheaper the better! Yep, you heard me, you can't go wrong with any gloves. Find a good deal and you're set. 

-Hockey Pants (Breezers)

Breezers vary in price, but they are all pretty much the same performance wise. Be sure to use the sizing chart closely to make sure to get the right fit for your kiddo. Leighton's we got used, and Kade has these. 

-Mouthguard

Only 12U and older need mouth guards. You can get them at pretty much any sports equipment store. 

Those are all of the "NEED" items. Here is a list of some other things that you may want to get but don't absolutely need. 


- Shock Doctor Shorts

These are super cool shorts that have a built in jock strap, and velcro at the bottom of the shorts that you can stick your hockey socks to. Both of our kids wear these and it makes keeping the hockey socks on WAY easier. (They work for girls too, even though they have a jock strap! Just take out the cup and enjoy the conversation starter...)


- Hockey Water Bottle

Because the helmets have masks and are pretty difficult for kids to get off by themselves, it's best to get a water bottle for them that has a long bent straw or one that squirts water out into their mouths in a steady stream when it is squeezed. These are the ones we like. 

- Base Layer


Basically the same thing you would wear underneath your snow suit when you go skiing or snowboarding. The ones we have for the kids were from costco, they usually have them every year. It's nice to have at least 2 so you aren't having to wash them super quickly in between practices and games. The first year Leighton just wore sweatpants and a sweatshirt underneath her gear, but a base layer is nice to have.

- Skate Guards

I already linked the ones we like above, they are adjustable and stay on the kids skates well. We dress at home often times so it makes it so the kids can get fully dressed, and be able to walk from the car to the rink with their skates already on. 

- Practice Jersey & Socks

It is nice to have a practice jersey and socks to help with laundry and to keep the game jerseys/socks looking AND smelling and fresh. You can order socks through your association or on Amazon; same goes for practice jerseys. 

- Stick Tape & Sock Tape

Stick tape is thicker and colored, sock tape is usually clear. You can find them on Hockey Monkey, Amazon or your local hockey store if you have one. Some ice rinks sell it as well, (Ours will have them this year!). 

- "My First Book of Hockey", by the editors of Sports Illustrated Kids 

The kids got this book last year as a gift and it is a huge hit! It helps to explain the rules of the game (for the kids and the adults) in a fun way. I wish we had this book from the beginning! 


That is it my friends! I sure hope this helps some cold and confused hockey parent out there. Thanks for reading and please share this with anyone you think would enjoy or benefit! I'll be posting soon about the must haves for your hockey mom/dad bag, too! Happy Hockey Season!

-Kaci


A Night in Snohomish, Washington - A Hidden Gem

Tuesday, November 6, 2018


Hey Friends! 
Hope you all had an excellent weekend! Over the weekend, the kids and I made a trip over the mountains to see some of my best and oldest childhood friends. My first stop was my hometown, Enumclaw. Unfortunately I didn't snap any good pics of the area while I was there. Someday I will do a whole post about that sweet little town. It is nestled just below Mt.Rainier with gorgeous views of the mountain almost daily. After leaving Enumclaw I headed toward Snohomish. My friend and her husband recently bought a home there. I had never been to the area before, and I was surprised by how beautiful it was. 
Heading into the downtown area of Snohomish, there were gorgeous views of lucious green farmland and marshes. I am not sure if it is the changing of the seasons, or what it is exactly, but I have recently been in awe of how beautiful nature truly is. It is easy to let this beauty go unnoticed while we are all rushing through life, but taking the time to "stop and smell the roses", really has it's perks. Snohomish is definitely a place I would love to return to for some more exploring. Here are some pictures I took on our way out of town. 


It was a very quick trip, and there wasn't very much time for adventuring. We spent most of our time visiting, catching up and watching the Washington State Cougars beat Cal. But before the game started, we had dinner at Cathouse Pizza. The pizza was so flavorful and the energy in the restaurant was fun and laid back, perfect for a family/friends outing.


Thanks for reading! If you have any more hidden gems in Snohomish I should know about for next time, please share them with me! I love trying new places. I know there is some kind of "haunted" bar there that sounded like a neat place to explore sometime.

-Kaci

The Secret to Stress Free Travel Prep with Kids

Wednesday, October 24, 2018

Happy Wednesday friends!


This week we are preparing to leave on a short trip. Here it is the day before and it seems like I have a million things to do! One of my favorite ways to prepare for a trip or an event of any kind, is by making a list. Lists are the only way I can really be sure I haven't forgotten anything. Today I created an awesome, simple, checklist to help get our bags packed and ready to go! It includes a checklist for each person (two kids, two adults) for both suitcases and carry on bags. It also includes some other bonus tips for stress free vacation prep!

My secret to stress free travel preparation, with kids, (or without, honestly!) is to simply make a list, and plan ahead. That's it! No one likes to feel like they are forgetting something, OR like they are rushed. Rushing not only creates stress for you, but your kids as well. Without fail, if I am in a hurry, you can bet my kids will either A) have a melt down, or B) make a huge mess, or both, at the same time. Can we all agree we want to avoid those things at all costs?!

Another awesome thing we do is let the kids pack their bags. No, I don't mean it's a "free for all"! Lord only knows what they might pack if that was the case! Leighton is able to read now, so she can easily look at the checklist and pack her bag herself. Kade is a bit younger, so we just read the things to him and he grabs them for us. In the past I have also created a "picture list" of what to pack and had them do it that way. It takes a little bit longer but it really helps the kids feel involved and teaches them how to pack a bag. Real life lessons are a fave in this house. I don't want to be packing my kids bags forever and ever, (although I am sure I'll miss it, someday).

Here are the kiddos suitcases, all packed and ready to go. You'll notice, in Kade's suitcase, a plastic bag with an outfit in it. Some people like to put each and every outfit in a separate plastic bag, but that is just a little bit too much for me. (No judgement!) I find that when my kids pick out their outfits they are more likely to ACTUALLY get dressed when we ask them to. Yes, sometimes seeing what they come up with can be painful; but like I have said before, I like to pick my battles wisely! So, with that being said, the outfit in the bag is a "nice" outfit. We have a fancier dinner planned for our trip and I want to make sure his outfit stays separate and available for that specific dinner.


Having well packed, carry on bags when you have kids, is a must! Here is a general list of things I like to pack in each kids carry on backpack. I like them to have their own, that way they aren't arguing over who's carrying it, or who isn't, etc.

- Snacks: Try to stay away from things that need to be refrigerated and things that are liquid. Those won't make it through security, and no one wants a kiddo crying in the airport because their favorite snack got thrown away! We usually do dried fruit and some sort of cracker.
- Entertainment: This can be different for each kid. Leighton loves to color so I usually pack her a small baggie of crayons (less is more!) and a coloring book. She loves music, so I let her bring her MP3 player to listen to with headphones. I also pack her "Letter Lunchbox". This is something I made before our trip to Disneyland last year. She loves it. It helps her practice her words, and the magnets & dry erase markers are fun for her to use.


For Kade, I also pack some color crayons and a small coloring book. He really likes to stay busy with hands on things so I like to pack a small container of playdough, with some pipe cleaners, and cut straws for him to stick in it and play with. It isn't messy and keeps him entertained. Another great idea for toddlers I have heard about, but haven't tried, is using window clings to let the kids stick on the tray and windows to play with.
- A Change of Clothes: This is not only for the younger kiddos still getting through potty training, but for the older ones too. You never know what kind of spills can happen and it's always better to be safe than sorry. Along with this, I usually bring one used grocery bag in my carry on to put wet or soiled clothes, just in case. It is also a good idea to bring a light jacket or sweatshirt for the kids so they adjust to the temperature on the plane as well as your destination.

I won't go into too much detail about what I pack in my carry on but here are a few of my must haves. I will also say, I love the convenience of carrying a backpack vs a purse. Being hands free, with kids, is a huge bonus!

- Phone charger
- Headphones
- Magazine & Book (My current favorite books are "The Subtle art of not giving a F*ck", and "Simplicity Parenting", although I highly doubt I will have time to read on an airplane with two small children; ha, ha!).
- Breath Mints or Gum
- Water bottle
-  Notebook - I like to have my notebook on me at all times for brainstorming!
-  Wallet - duh.
-  Protein Bar - My favorite ones are the Mint Chocolate Chunk Quest Bars
-  Compact powder makeup 
-  Hair tie 
- Travel size deodorant
- Chapstick 
- Printed flight and hotel info - I have everything on my phone, but I like to have a printed copy just in case!

I sure hope these tips helped you to make your next family trip prep, a breeze. I absolutely love going on adventures with my little family. Sometimes it is easy to let the stress of traveling take over your mood. Don't forget what a blessing it is to be able to do it in the first place, and remember your kids will reflect your mood! Make sure its a positive one and you should be all set!

Thanks for reading & please comment below and let me know if this post was helpful or not! Safe travels and happy adventuring!

*BONUS* If you share my link with some friends on social media, or simply shoot me an e-mail, message or comment & I will send you a FREE PDF of my "Travel Prep Checklist"!

-Kaci


Spooky, Fun Halloween Felt Wall

Hey friends!
I thought I was all done with my Halloween crafts and activities for the season (besides trick or treating of course!). But, as always, my kiddos inspired me to create another fun, seasonal activity.

Leighton and Kade had been working on creating a "spider web" out of string for days, or dare I say it..weeks! They were using tape to put the strings up in doorways and on walls. I let them experiment with it for quite some time until I finally got sick of finding scraps of tape everywhere and "spider web" blocked doorways around every corner. (What a grump, I know!) As I was cleaning up one evening, shoving all the lose strings into a drawer, the idea of a fun felt wall popped into my mind. I made a mental list and was off to the store for supplies the next day.


Here is a list of the supplies!

1. FELT-

  2 yards of black for the spider web, ( I got extra in case I made a mistake while cutting!)1 yard of grey for the background, 2ft of purple, green, white, & small sheets of felt for any other colors you would like to use for shapes. You can find the smaller sheets of felt in the kids craft areas in most stores. The options are endless! 

2. GOOD SCISSORS -

You will want to make sure your scissors are sharp to cut the felt shapes out accurately. 

3. THUMB TACKS - 

I used these to hang up the felt to the wall. 

4. GOOGLY EYES- 

I was originally going to glue these to the shapes I cut out, but decided to instead glue felt to the back of the eyes so the kids were able to move the eyes and put them wherever their little hearts desire. 


After gathering the supplies, I began cutting. I just cut out a large circle for the spider web. Then cut a slightly larger square for the background. After that I folded the circle three times over, and cut it like this. 
After that I laid it out and tacked it all onto the wall. I put it in the play room area in our house next to the kids' rooms, low enough for them to both be able to reach it. Then I began cutting out fun shapes for the kids to stick onto the web. I did ghosts, spiders & bats. I wish I would have bought some orange felt to add to the mix! I ended up having a ton of extra fabric so Kade and I decided to make a house along with the web. Next, I glued the felt to the back of the googly eyes. I think they both turned out super fun and cute! 


As soon as Leighton got home from school she started playing with it and moving the shapes around. She ended up also creating her own shape! A monster! I kept the extra felt out so she is able to create whatever she wants to add. While I was at the store I saw some pre cut felt letters. I feel like this would be an awesome purchase, along with the orange felt to add to the potential of this activity. 


Thanks for reading friends! When it comes to felt, the options are endless.Such a great activity for developing fine motor skills, along with creativity, colors and shapes. Adding the pre-cut letters would really add to the fun, too. There are tons of other fun shapes and things you could add to this project. I know there are some super creative people reading, I would love to see some of your felt ideas and projects!

-Kaci


EASY Halloween Activities to do with Your Kids

Thursday, October 18, 2018

Hey friends!
Am I the only one who thinks these holidays come faster and faster each year? Something about having kids makes everything just fly by, I swear. Well, it is almost Halloween! I usually try to do fun things with the kiddos around each holiday. Creating things together is something they always seem to remember the most. I know there are a bazillion ideas on Pinterest, but life is busy! Many of the projects look super cool but also look super time consuming. Here is a list of my favorite EASY Halloween activities you can do with your kids at home!

#1: Hand Bats


These are super duper easy and fun for the kids. All you need is some black paper, a pencil and some scissors. You can add googly eyes if you want to, we had some leftover from a different project so we used them. Leighton is actually the one who gave me this idea, she may have done it at school. All you do is fold the paper in half , then trace your kiddos hand, then cut and glue some eyes on. They could also color eyes or a face on the bats using a white crayon! These are fun decorations to hang on your fridge or place on a shelf. We decided to make a garland out of ours and it turned out really cute! I'll post pictures of the garland on my Facebook and Instagram pages, check it out!

#2: Painting Pumpkins


Painting pumpkins is something that can be fun for all ages, weather you are a 2 year old or an 80 year old! Sometimes carving pumpkins with little ones is fun, other times you just want to avoid the sharp objects, and let's face it, who is going to be doing most of the work? YOU, not them. This way they really feel included in making their pumpkin their very own masterpiece! This picture is an oldie but one of my favorites of my daughter painting her pumpkin. The options are endless and you can use any type of paint you want to! You could even glue on things or use stickers. An added bonus to this method is that your pumpkins will last longer.

#3: Spooky Expanding Ghost


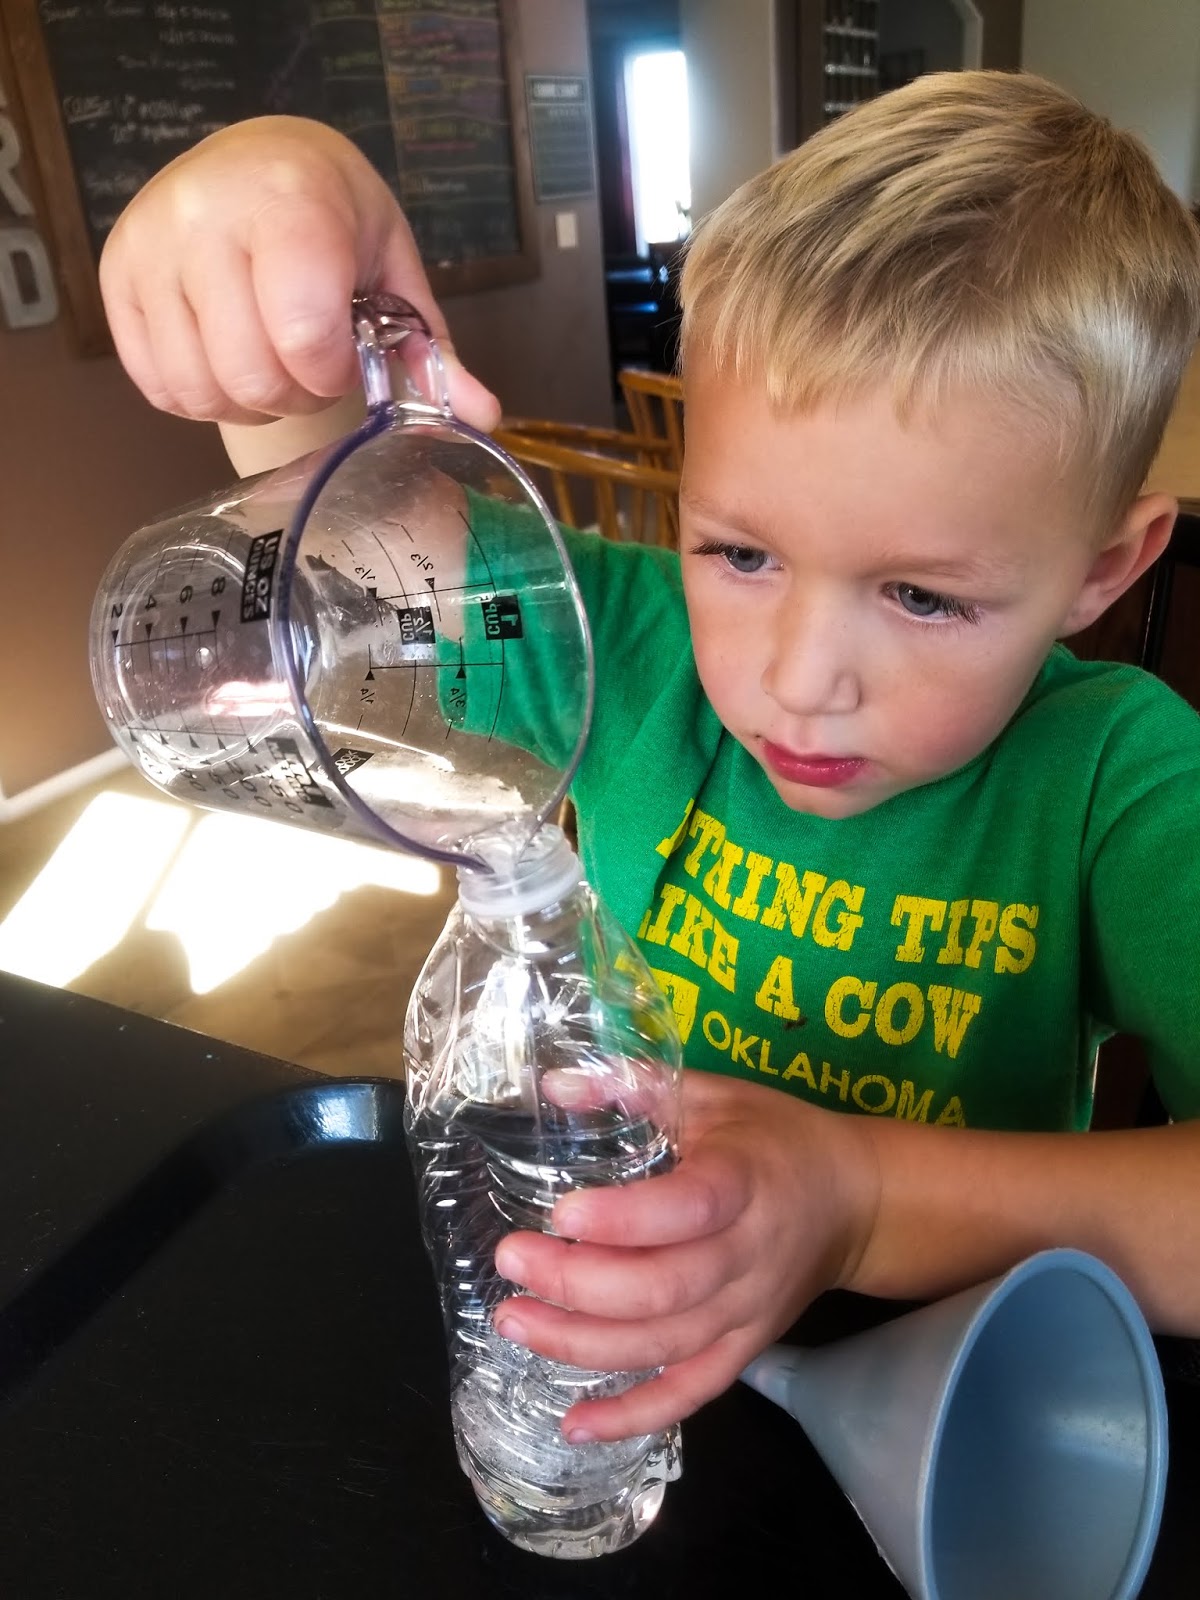
This is something I had been wanting to try for a while now, and I am so glad we did! I couldn't pick one picture because I just love seeing his facial expressions change throughout the process. Both of my kids loved it. Super easy, and easy to clean up. This literally took us 10 minutes to set up and do! I got the idea on Pinterest, here. You can check it out for the full tutorial! All you need is an empty water bottle, baking soda, a balloon, vinegar, and a small funnel! Most people can find this in their kitchen already.

#4: Pumpkin Hammering


Pumpkin hammering is an activity my kids both did at their cooperative preschool. It is so simple but toddlers love it. I found this tutorial on Pinterest, I couldn't find any old pictures of my kids doing it so I used this one! All you need for this one is a pumpkin, (preferably one that has been around for a bit), a toy hammer or kids wooden mallet, and golf tees. You can get some of the tees started for them to show them how it works, or just lay out all the supplies and see what they come up with. This is a great open ended learning opportunity for kids and it is also an awesome tool for fine motor skill development. 

#5: Halloween Glow in the Dark Slime


What kid doesn't love slime? I already posted about this in my "Friday Faves" last week, (you can find the link to the full tutorial there), but it is so simple and the glow in the dark glue makes it great for Halloween! 3 ingredients, and the kids are entertained for hours! It can be stored in any airtight container or baggie and used again and again. TIP: The more contact solution you add, the less sticky, icky it is. 

#6: Simply Spending Time Together


It is easy to get caught up trying to do it all. Sure, all these activities and the thousands of others on 
pinterest are great, but a fool proof way to make your kiddos day is to simply take the time to hang out with them. 
Hope you all have a fabulous day and I would love to see how some of your projects turn out, if you do any. Do you have any easy and fun Halloween inspired activities? I am always looking for new ideas! Comment below!

-Kaci


Family Pizza and Game Night

Monday, October 8, 2018


"Fri-yay" is officially the new "Friday" in the Howard home. I am not sure when it all started, but when the kids told Ty and I about their new name for the "best day of the week", it stuck; and for good reason. Fridays are the end of the long, busy, work & school filled week for all of us. It's the last day of early wake ups. The last afternoon of kid and car switches in the Starbucks parking lot. The last day of the "opposite work schedule" parent life shenanigans. The last day of meetings, workouts & alarm clocks (unless the next day is Cougar Football Saturday). Fri-yay is the beginning of a weekend spent together as a family, making those precious memories. We are very fortunate that our schedules work out this way, with both Ty and I having weekends off. It hasn't always been as such, but I sure am grateful it is now. 
It was Friday afternoon and I decided to ask Kade, if it were up to him, what he would like to do tonight. I wasn't expecting much, his usual answers consist of "I don't know" or something crazy like, "go fly an airplane". His answer was perfect. He said he wanted to have a family game, pizza and movie night. He was especially excited and clapped his hands together joyfully after telling me his epic idea. I was excited about the idea, too and got to planning & making a grocery list. The only thing I had to do was sell Ty on the idea. I was sure he would love everything except the pizza. Ty has recently been following a new diet, the Keto diet. He has been very successful in following it and has lost over 50 pounds. Here I was thinking what a pain it was going to be to cook him a separate "keto friendly" dinner. Not to mention the whole eating one of his favorite foods in front of him part. Then it clicked! One time a while back, when he was really craving some doughy carbs, he made a keto friendly pizza. It only had 4 ingredients (plus the toppings) and was surprisingly tasty. After some recipe research and a trip to the grocery store we were all set to make our own individual pizzas and bring Kade's epic idea to fruition. 
The ingredients for the dough are simple; cream cheese, shredded mozzarella cheese, eggs and almond flour. We prefer the texture of the super fine almond flour for pizza crusts. Here is a step by step description of how we made our pizzas. (I will add a link to the full recipe at the end of the post)

After preheating your oven to 425 degrees, combine the mozzarella cheese and the cream cheese in a medium to large microwavable dish. We used our largest Pyrex for this and it worked great. 


Then you will microwave it for 1 minute to 1 minute 30 seconds. We had the most success after 1:30 of microwave time. Once it is done, use a spatula or spoon to mix well until combined. After a couple of minutes a sticky, thick ball of dough will form. It should look like this:

 Next you will add the 2 eggs. It is very important to make sure the eggs are incorporated well. If you don't get them all the way mixed in it totally changes the look and texture of your pizza, for the worst. Then you will add in the almond flour. It is easiest to add in half at a time. Mix until well combined. If your dough gets a bit crumbly, place it back in the microwave to soften, for about 1 minute. All this mixing took some muscles, good thing Ty has been hitting those weights. We made 3 batches and he did the first two. 
For this next part you want to make sure to get your hands super wet, otherwise the dough will stick to your hands. Place the ball of dough on parchment paper and get to squashing and stretching that stuff til it's just how you like it. We split the dough in half and let the kids make their own mini pizzas. They love helping out in the kitchen and anything resembling play dough is extra fun. We had a tough time getting them to keep their hands wet enough at first. Then Ty came up with the idea to use the water filled pie dish, so they were able to get their hands wet as needed. Brains and muscles, how did I get so lucky?! Well..I know how, but that's a story for another day. 

After getting the dough to the shape and thickness you prefer, place your parchment paper on a pizza pan or a cookie sheet. We used a cookie sheet for the kids' so we could cook them together. Use a fork to poke a few holes in your dough, then let it cook in the oven for about 8 minutes. After 8 minutes is up, take the dough out and it's time to start adding those toppings. For toppings, we decided to use a classic pizza sauce, mozzarella cheese, pepperoni, spicy sausage, mushrooms, artichokes and spinach. 
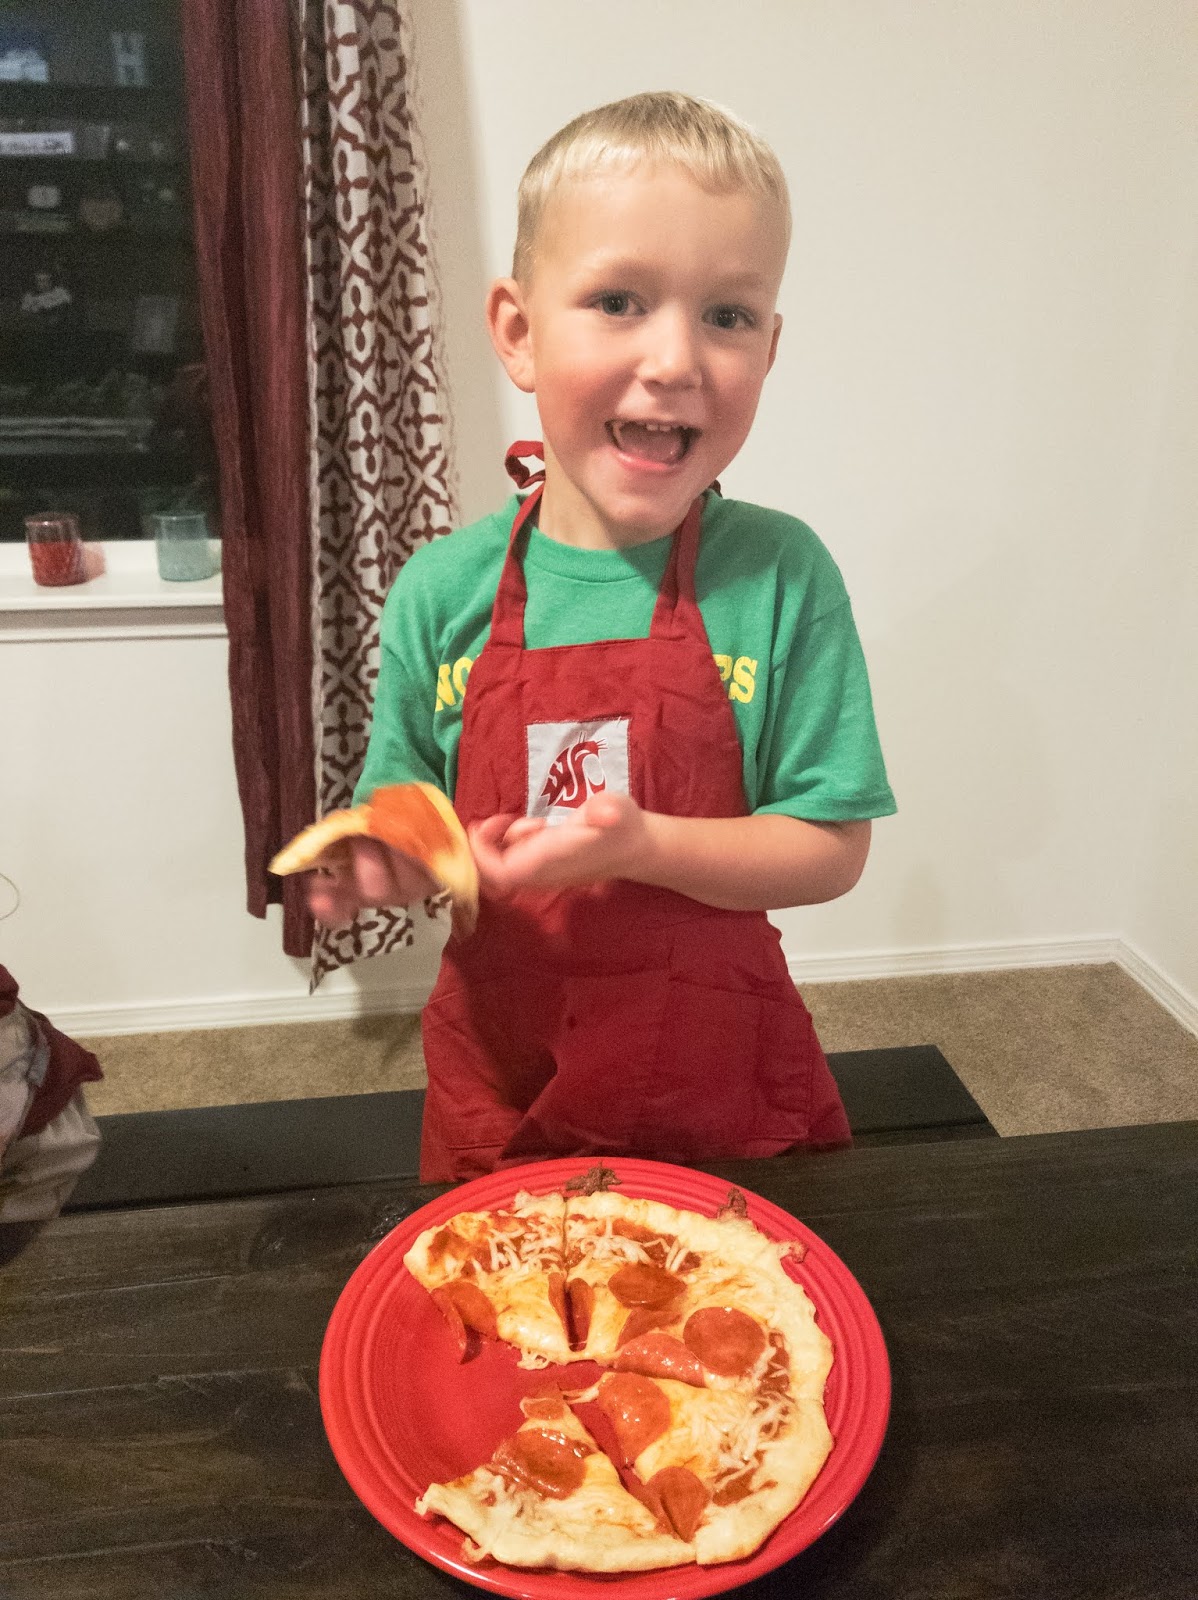
The kids picked their favorite, pepperoni for their topping. Big surprise there. I tried to convince them to be a little more adventurous but it was a hard pass on the veggies, this time around. You have to pick your battles, right? Ty opted for mushrooms, pepperoni and spicy sausage while I went with spinach and artichokes. 

After the toppings are all added place your pizza back in the oven for about 6 minutes. Super quick! We were wondering if the cook time would be different for the mini pizzas versus the regular sized ones, but all came out perfect. I think these faces say it all. 


Family pizza, game and movie night was off to a great start. Now with our tummies full and the kitchen a mess, we moved onto the games. These are the ones we went with; Uno, twister and an assortment of kid friendly card games I found at the very bottom of our ottoman. 

Uno is always a hit with our kids and works great for all ages. Kade, 3 years and Leighton, 6 years old can both play with little to no help from us. It is a great way for kids to familiarize with numbers and colors, too. Yay for an educational bonus! Next, Leighton chose Old Maid. I had never played this but it was another perfect one for both of the kiddos. Kade needed a little bit of help but not much. This game is a good one for matching, reading and colors as well. My favorite was Twister, Ty opted to be the spinner. I did better than I had expected going up against my two super flexible energetic kiddos. I felt super silly, but hearing their little giggles and seeing their eyes light up made it all worth the effort. Overall, I think Uno was the overall family favorite, as usual. But it was fun to try some new games and I was glad to switch it up. 


As the night started winding down, we moved onto the movie portion of our evening. Pj's were on, popcorn was popped, and both our tummies and our hearts were full. Leighton chose Loony Toons, a classic that our whole family enjoyed. Although, I can't lie, I was secretly hoping for Hocus Pocus; my all time fall and halloween favorite. Luckily there is still plenty of time to sneak that one in here before the season is over. Family time with the four of us is truly what makes me happy. It's not always easy to find things to do that the whole family can enjoy, but it sure is worth the effort when it all works out. I would say Kade's idea of a fun night turned out pretty amazing. I hope this post gave some of you new ideas on how to have a fun Fri-yay the entire family can enjoy, or at least a new fun recipe to try.  Here is the full Keto Fathead Pizza Recipe . Thanks for reading! -Kaci


Powered by Blogger.

Search This Blog

Theme Designed By Hello Manhattan
|

Your copyright

Your own copyright